Hello Lovely! And welcome to my Free Puppy Baby Blanket Crochet/Amigurumi Pattern.
I am a big dog lover, which is why I just loved designing this blanket, I have grown up with dogs my entire life, and at the time of writing this I am currently the human slave to my American Staffordshire Terrier named Kenzie.
She is the most beautiful dog and just full of personality, also very cheeky and knows how to get what she wants.
And I swear she holds grudges… because she farts on me a lot, but doesn’t do that to anybody else, and then she gets this huge cheeky grin…. but anyway isn’t she adorable?
I know you’re not here to see pictures of my dog, but I just couldn’t resist, she is just so photogenic, but let’s get on with the real reason your here, my Free Puppy Baby Blanket Crochet Pattern.
It is a 3in1 baby blanket so it can be used for more than just 1 purpose.
It can be used as a baby blanket, however I do recommend supervision at all times, a playmat, again supervision as you can never be too careful with babies and toddlers, as well as a decoration, when not in use simply hang it over a chair or a cot to make your babies or toddlers room stand out.
I do hope you love my free pattern, and I would love to see it if you make one in different colours so be sure to post yours up in the comments!
So without further ado, my Free Puppy Baby Blanket Crochet/Amigurumi Pattern.
This pattern is also available as an ad-free, printer-friendly with step by step pictures pdf pattern that can be purchased at the links below on either Etsy or Ravelry.
Free Puppy Baby Blanket Crochet/Amigurumi Pattern.
Designed by Nicola Marie Rattley.
Copyright 2025 by Nicola Rattley.
All rights reserved. No part of this pattern may be reproduced in any form or by any electronic or mechanical means, including information storage and retrieval systems, without written permission from the publisher.
The contents of this pattern are for personal use only. Patterns herein may be reproduced in limited quantities for such use. Any large-scale commercial reproduction is prohibited without the written consent of the publisher.
Required:
Hook Size – 4mm Crochet Hook. (AUS).
Wool Ply – 8 Ply, DK.
2 Balls of Dark Brown.
4 Balls of Light Brown.
2 Balls of Cream.
Tapestry Needle.
Polyester Toy Filling.
Safety Eyes – 16mm (DISCLAIMER/WARNING) – I used safety eyes to make the pattern but if you are going to be giving this to a child under the age of 6 safety eyes can be a choking hazard and you may want to consider embroidering the eyes instead.
Stitch Marker.
Finished Size – 35 Inches by 35 Inches.
Perfect for a Stroller Blanket or a Receiving Blanket.
Abbreviations: (This Pattern is for US Terminology).
Ch – Chain.
SC – Single Crochet.
2SC – 2 SC in same stitch (increase).
SC2Tog – SC 2 stitches together (decrease).
St – Stitch.
Sts – Stitches.
MR – Magic Ring (otherwise known as Magic Circle).
Pattern.
Blanket.
You make this pattern in strips to sew together, this allows for less sewing that patches would require.
Make 3 Strips like this (Dark Brown/Light Brown) and Make 4 Strips like this (Light Brown/Cream).
Start with Dark Brown Yarn. (Light Brown Yarn).
Ch 21 Stitches.
SC into the 2nd chain from the hook, single crochet row.
Rows 2 – 24 – SC 23 Rows.
(Important Note – Be sure to chain at the end of each row and turn your work to start your next row so it starts each row evenly).
Change Colour to Light Brown. (Cream).
Rows 25 – 48 – SC 24 Rows.
Change Colour to Dark Brown. (Light Brown).
Rows 49 – 72 – SC 24 Rows.
Change Colour to Light Brown. (Cream).
Rows 73 – 96 – SC 24 Rows.
Change Colour to Dark Brown. (Light Brown).
Rows 97 – 120 – SC 24 Rows.
Change Colour to Light Brown. (Cream).
Rows 121 – 144 – SC 24 Rows.
Change Colour to Dark Brown. (Light Brown).
Rows 145 – 168 – SC 24 Rows.
Fasten Off.
(Note – When I was changing the colours I used this as the time to sew in my loose ends by crocheting them in so there would be less sewing later on, you may or may not choose to do this).
You should have 7 squares starting and ending with the dark brown (light brown).
Repeat this process with the Light Brown and Cream Strips, starting with the Light Brown in place of the Dark Brown.
Border (Optional).
Once the blanket is sewn together you may add a border.
Starting in the top corner with the Dark Brown Yarn, SC along the whole top of the blanket.
This should be approximately 133 stitches (this will depend on your sewing seams for the strips).
This should be approximately the same for the bottom amount.
SC 2 times in the corner stitches of the blanket to make nice, even curves.
SC down the sides of the blanket by SC into every row.
This should be approximately 168 stitches (this will depend on your colour joins and if you can or cannot SC into those).
This should be approximately the same for both sides.
To finish off the border neatly slip stitch into the first st.
Fasten Off.
Puppy Head.
Start with the Cream Colour Yarn (Use a stitch marker to keep track of your first st as you will be working in round for the rest of this pattern).
Starting with a Magic Ring, SC 6 stitches into the MR.
Round 1 – 2SC into each st to the end of round. (12 sts).
Round 2 – (SC 1, 2SC into the next st) repeat to the end of round. (18 sts).
Round 3 – (SC 2, 2SC into the next st) repeat to the end of round. (24 sts).
Round 4 – (SC 3, 2SC into the next st) repeat to the end of round. (30 sts).
Round 5 – (SC 4, 2SC into the next st) repeat to the end of round. (36 sts).
Rounds 6 – 10 – SC 5 Rounds.
Change Yarn Colour to Light Brown.
Round 11 – SC 1 Round.
Round 12 – (SC 5, 2SC into the next st) repeat to the end of round. (42 sts).
Round 13 – SC 1 Round.
Round 14 – (SC 6, 2SC into the next st) repeat to the end of round. (48 sts).
Round 15 – SC 1 Round.
Round 16 – (SC 7, 2SC into the next st) repeat to the end of round. (54 sts).
Round 17 – SC 1 Round.
Round 18 – (SC 8, 2SC into the next st) repeat to the end of round. (60 sts).
Rounds 19 – 24 – SC 6 Rounds.
Round 25 – (SC 8, SC2Tog) repeat to the end of round. (54 sts).
Insert the safety eyes in between rounds 7 and 8 of the light brown colour, roughly 2 inches apart.
And embroider the nose with Dark Brown Yarn between the rounds 4 and 6 (not including the magic ring round).
Rounds 26 – 27 – SC 2 Rounds.
Round 28 – (SC 7, SC2Tog) repeat to the end of round. (48 sts).
Rounds 29 – 30 – SC 2 Rounds.
Round 31 – (SC 6, SC2Tog) repeat to the end of round. (42 sts).
Round 32 – SC 1 Round.
Round 33 – (SC 5, SC2Tog) repeat to the end of round. (36 sts).
Round 34 – SC 1 Round.
Start Stuffing the Head as you go.
Round 35 – (SC 4, SC2Tog) repeat to the end of round. (30 sts).
Round 36 – (SC 3, SC2Tog) repeat to the end of round. (24 sts).
Round 37 – (SC 2, SC2Tog) repeat to the end of round. (18 sts).
Finish last bit of stuffing.
Round 38 – (SC 1, SC2Tog) repeat to the end of round. (12 sts).
Round 39 – SC2Tog to the end of round. (6 sts).
Fasten Off and Sew Up.
Floppy Puppy Ears. (Make Two).
Using Dark Brown Yarn.
Starting with a Magic Ring, SC 6 Stitches into the MR.
Round 1 – 2SC into each st to the end of round. (12 sts).
Round 2 – SC 1 Round.
Round 3 – (SC 1, 2SC into the next st) repeat to the end of round. (18 sts).
Round 4 – SC 1 Round.
Round 5 – (SC 2, 2SC into the next st) repeat to the end of round. (24 sts).
Rounds 6 – 9 – SC 4 Rounds.
Round 10 – SC2Tog, SC 10, SC2Tog, SC 10. (22 sts).
Round 11 – SC 1 Round.
Round 12 – SC2Tog, SC 9, SC2Tog, SC 9. (20 sts).
Round 13 – SC 1 Round.
Round 14 – SC2Tog, SC 8, SC2Tog, SC 8. (18 sts).
Round 15 – SC 1 Round.
Round 16 – SC2Tog, SC 7, SC2Tog, SC 7. (16 sts).
Rounds 17 – 31 – SC 15 Rounds.
Fasten Off and Sew Up Flat. (Do not Stuff).
Puppy Legs. (Make Four).
Using Cream Coloured Yarn.
Start with a Magic Ring, SC 6 Stitches into the MR.
Round 1 – 2SC into each st to the end of round. (12 sts).
Round 2 – (SC 1, 2SC into the next st) repeat to the end of round. (18 sts).
Round 3 – (SC 2, 2SC into the next st) repeat to the end of round. (24 sts).
Round 4 – (SC 3, 2SC into the next st) repeat to the end of round. (30 sts).
Rounds 5 – 10 – SC 6 Rounds.
Round 11 – (SC 3, SC2Tog) repeat to the end of round. (24 sts).
Change Colour to Light Brown.
Round 12 – (SC 2, SC2Tog) repeat to the end of round. (18 sts).
Rounds 13 – 34 – SC 22 Rounds.
(Important Note – Start Stuffing your legs around the round 20 and then continue stuffing as you go).
Fasten Off, and Sew Up Flat, only stuffing light at the top.
Tail.
(Note – Slowly Stuff as you go, only stuff lightly).
Using Cream Colour Yarn.
Start with a Magic Ring, SC 6 Stitches into the MR.
Round 1 – SC 1 Round.
Round 2 – (SC 1, 2SC into the next st) repeat to the end of round. (9 sts).
Round 3 – SC 1 Round.
Turn your tail into the right way here, otherwise the longer it gets the harder it is to turn out the right way.
Rounds 4 – 9 – SC 6 Rounds.
Change Colour to Light Brown.
Rounds 10 – 31 – SC 22 Rounds.
Fasten Off and Sew Up Flat.
Congrats you should now have completed all the pieces you need to assembly your Puppy Baby Blanket/Playmat/Decoration.
Now it is time to assemble it all.
(Please Note – I do provide step-by-step pictures off all the pieces and assembly but only in my paid version on Etsy and Ravelry, so if you are wanting more assistance with the assembly, check on my links at the top of the pattern).
First you need to start with sewing the ears onto the head.
You should have sewn them flat so that you can easily pin them to the top sides of the head, pinning them helps keep them in place and allows you to line them up to make sure they match as much as possible.
Then once you are happy with the placement, simply sew them into the head.
Once that is done you are up to sewing the head onto the blanket.
This can be tricky but I found sewing from the bottom of the blanket up into the head worked best for me.
Make sure your head is placed on the middle front square.
Once your head is sewn on, please be sure to make sure it is secure as it can be very wobbly if not sewn in very well done.
Next is the sew the legs onto it.
So to do this you will need to know where and hold to fold you blanket.
First – Lay your blanket flat upside down.
Second – Fold your blanket from both sides so the meet in the middle.
Third – Fold your blanket from the top down.
Your head should be in the middle brown square.
Now you line up your legs on the sides at the front and back, I found it helped to pin them in to hold their place while I sewed them in.
Be careful you don’t sew into more than one layer of the blanket as this is very easy to do.
Now you need to sew in the tail.
Again pinning it helps a lot and it goes at the back, in the middle square, lined up with the back legs.
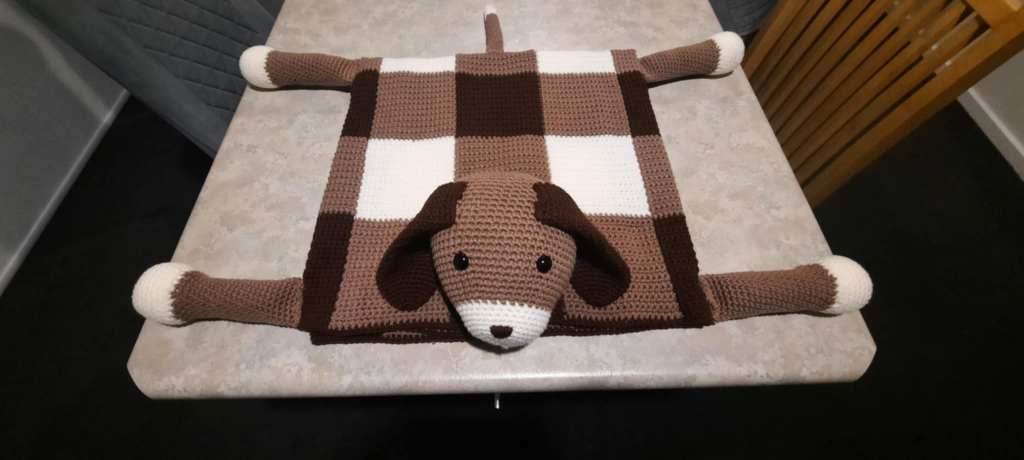
Now all your pieces should be sewn in!
You blanket should now look like this!
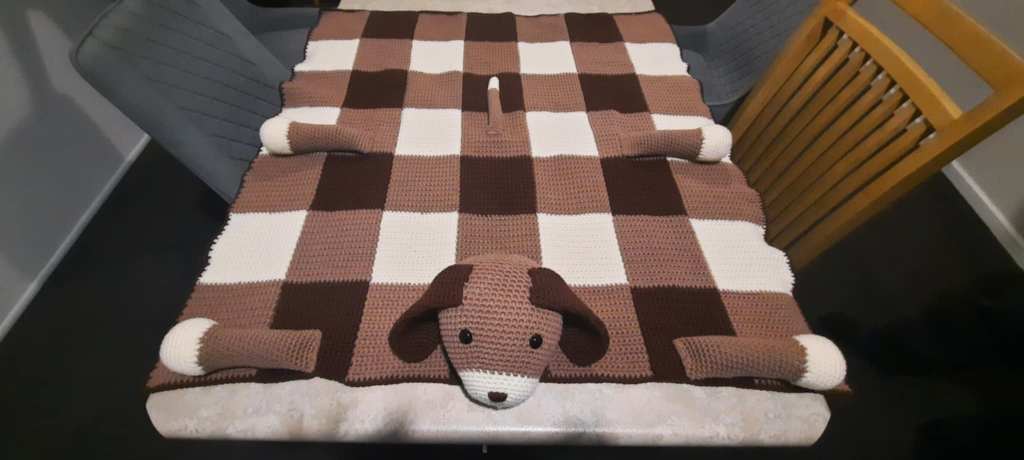
You have completed your Puppy Baby Blanket/Playmat/Decoration!
If you have enjoyed crochet my adorable Free Puppy Baby Blanket Crochet/Amigurumi Pattern I would love if you could leave a comment telling me what you love about it, also don’t forget to post up your pictures of your own Puppy Baby Blanket!
Also don’t forget to subscribe to my website for more Free Patterns to come.
If you have enjoyed this pattern you may also enjoy my:
Free Poke-Ball Crochet Pattern
Free Sweet Pea the Elephant Crochet Pattern
Free Mini Bumble Bee Crochet/Amigurumi Pattern
xx Nicola.

Leave a Reply