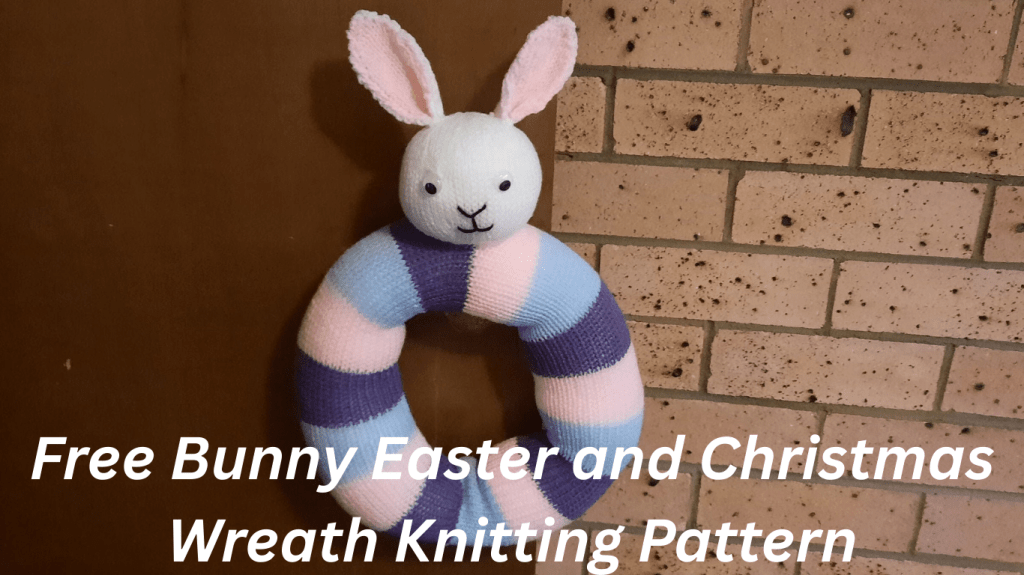
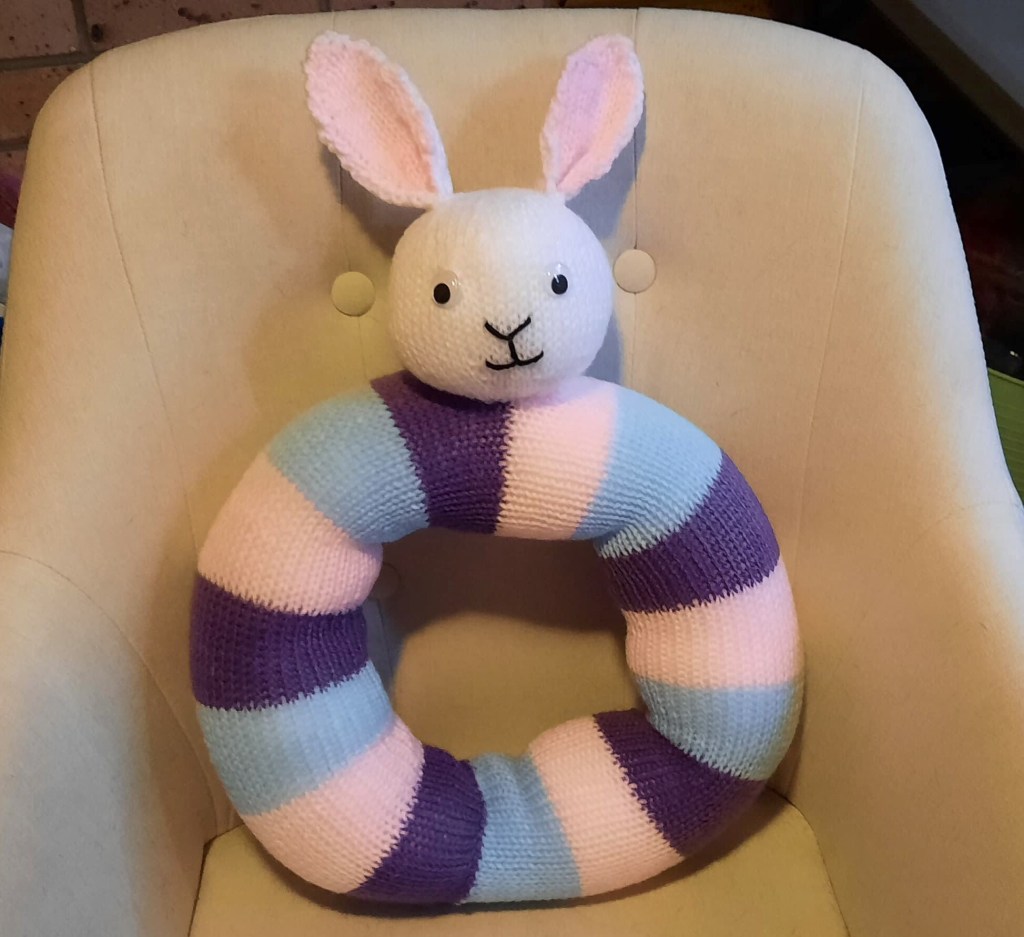
Hello Lovely! And welcome to my Free Bunny Easter and Christmas Wreath Knitting Pattern.
I love making bunnies, especially around Easter time and giving them as gifts as well as the chocolate, its especially great if you have kids because then they get a toy that they can keep.
As well as Christmas time, because let’s face it, bunnies are a timeless animal, they are great for all year-round gifts, however for this pattern, I didn’t want to do just another bunny toy, that is when I decided to turn it into a Wreath instead, that can be used for both Easter and Christmas.
It is perfect for beginners, and even people who have been knitting for years.
The pattern is very easy to follow and actually really fun to make, I love changing the colours so they come out in beautiful stripes and I like to use light colours that are easy on the eyes and perfect for Easter.
But please feel free to use whatever colours you choose.
And you can make it in one solid colour also if you want, you don’t have to make it stripey.
So here you go, an Easter treat that’s not chocolate, just for you, my Free Bunny Easter and Christmas Wreath Knitting Pattern.
I hope you enjoy and have a wonderful time making this beautiful wreath.
This pattern is also available as an ad-free, printer-friendly pdf pattern that can be purchased at the link below for only a small fee on Etsy.
Ad-Free, Printer-Friendly Pdf Pattern of Bunny Easter and Christmas Wreath Knitting Pattern
Free Bunny Easter and Christmas Wreath Knitting Pattern.
Designed by Nicola Marie Rattley.
Copyright 2021 by Nicola Marie Rattley.
All rights reserved. No part of this pattern may be reproduced or transmitted in any form or by any means, electronic or mechanical, including photocopying, recording, or by any information storage and retrieval system, without permission in writing from the copyright owner.
Required:
Needle Size – 4mm Single Point Needles.
Wool Ply – 8 Ply, DK.
1 Ball of White Wool.
1 Ball of Purple Wool.
1 Ball of Blue Wool.
1 Ball of Pink Wool.
Tapestry Needle.
Polyester Toy Filling.
Sewn In Wobbly Eyes.
Warning – If this item will be in reach of toddlers under the age of 3, I recommend that you embroider the eyes instead so they don’t pose a choking hazard.
Finished Size: 48cm Tall and 35cm Wide.
Abbreviations:
KFB – Knit Front and Back of Stitch, otherwise known as increase.
St-St – Stocking Stitch.
K2Tog – Knit 2 Together, otherwise known as decrease.
St – Stitch.
Sts – Stitches.
Pattern.
Wreath.
Cast on 40 Stitches with Purple Wool.
Row 1 — Purl Row.
Rows 2 – 11 – St-St 10 rows starting with a knit row and ending with a purl row.
Change Colour to Pink Wool.
Rows 12 – 23 – St-St 12 rows starting with a knit row and ending with a purl row.
Change Colour to Blue Wool.
Rows 24 – 35 – St-St 12 rows starting with a knit row and ending with a purl row.
Change Colour to Purple Wool.
Rows 36 – 47 – St-St 12 rows starting with a knit row and ending with a purl row.
Change Colour to Pink Wool.
Rows 48 – 59 – St-St 12 rows starting with a knit row and ending with a purl row.
Change Colour to Blue Wool.
Rows 60 – 71 – St-St 12 rows starting with a knit row and ending with a purl row.
Change Colour to Purple Wool.
Rows 72 – 83 – St-St 12 rows starting with a knit row and ending with a purl row.
Change Colour to Pink Wool.
Rows 84 – 95 – St-St 12 rows starting with a knit row and ending with a purl row.
Change Colour to Blue Wool.
Rows 96 – 107 – St-St 12 rows starting with a knit row and ending with a purl row.
Change Colour to Purple Wool.
Rows 108 – 119 – St-St 12 rows starting with a knit row and ending with a purl row.
Change Colour to Pink Wool.
Rows 120 – 131 – St-St 12 rows starting with a knit row and ending with a purl row.
Change Colour to Blue Wool.
Rows 132 – 143 – St-St 12 rows starting with a knit row and ending with a purl row.
Change Colour to Purple Wool.
Rows 144 – 155 – St-St 12 rows starting with a knit row and ending with a purl row.
Change Colour to Pink Wool.
Rows 156 – 167 – St-St 12 rows starting with a knit row and ending with a purl row.
Change Colour to Blue Wool.
Rows 168 – 179 – St-St 12 rows starting with a knit row and ending with a purl row.
Cast Off.
Bunny Head.
Cast on 10 Stitches with White Wool.
Row 1 – Purl Row.
Row 2 – KFB in every st to the end of row. 20 sts remaining.
Row 3 – Purl Row.
Row 4 – (Knit 1 st, KFB 1 st) repeat to the end of row. 30 sts remaining.
Row 5 – Purl Row.
Row 6 – (Knit 2 sts, KFB 1 st) repeat to the end of row. 40 sts remaining.
Row 7 – Purl Row.
Row 8 – (Knit 3 sts, KFB 1 st) repeat to the end of row. 50 sts remaining.
Row 9 – Purl Row.
Row 10 – (Knit 4 sts, KFB 1 st) repeat to the end of row. 60 sts remaining.
Row 11 – Purl Row.
Rows 12 – 23 – St-St 12 rows starting with a knit row and ending with a purl row.
Row 24 – Knit 2 sts, (K2Tog, Knit 4 sts) 9 times, K2Tog, Knit 2 sts. 50 sts remaining.
Row 25 – Purl Row.
Row 26 – Knit 2 sts, (K2Tog, Knit 3 sts) 9 times, K2Tog, Knit 1 st. 40 sts remaining.
Row 27 – Purl Row.
Row 28 – Knit 1 st, (K2Tog, Knit 2 sts) 9 times, K2Tog, Knit 1 st. 30 sts remaining.
Row 29 – Purl Row.
Row 30 – Knit 1 st, (K2Tog, Knit 1 st) 9 times, K2Tog. 20 sts remaining.
Row 31 – Purl Row.
Row 32 – K2Tog to the end of row. 10 sts remaining.
Fasten Off, Sew Up and Stuff.
Outer Ears. (Make Two Pieces).
Cast on 4 Stitches with White Wool.
Row 1 – Purl Row.
Row 2 – KFB 1 st at each end of row. 6 sts remaining.
Row 3 – Purl Row.
Row 4 – KFB 1 st at each end of row. 8 sts remaining.
Row 5 – Purl Row.
Row 6 – KFB 1 st at each end of row. 10 sts remaining.
Row 7 – Purl Row.
Row 8 – KFB 1 st at each end of row. 12 sts remaining.
Row 9 – Purl Row.
Rows 10 – 25 – St-St 16 rows starting with a knit row and ending with a purl row.
Cast Off.
Inner Ears. (Make Two Pieces).
Cast on 2 Stitches with Pink Wool.
Row 1 – Purl Row.
Row 2 – KFB 1 st at each end of row. 4 sts remaining.
Row 3 – Purl Row.
Row 4 – KFB 1 st at each end of row. 6 sts remaining.
Row 5 – Purl Row.
Row 6 – KFB 1 st at each end of row. 8 sts remaining.
Row 7 – Purl Row.
Row 8 – KFB 1 st at each end of row. 10 sts remaining.
Row 9 – Purl Row.
Rows 10 – 23 – St-St 14 rows starting with a knit row and ending with a purl row.
Cast Off.
How To Make It Up.
Simply sew up the wreath, leaving the ends open, then stuff it firmly, then sew the ends together keeping the circle shape.
Sew up and stuff the head, for the eyes I used sewn in wobbly eyes but these can be a choking hazard with small children so you can embroider the eyes if you wish.
Sew the inner ear piece to the outer ear piece, then fold the bottom pieces of the ear together at the front and sew them like that, this helps to get and keep the shape for when you sew them top the top of the head.
Sew the ears to the head, and then simply sew the head onto the top of the wreath and there you have it!
You have completed you Bunny Easter and Christmas Wreath!
If you have enjoyed knitting my adorable Free Bunny Easter and Christmas Wreath Knitting Pattern I would love if you could leave a comment telling me what you love about it, also don’t forget to post up your pictures of your own Bunny Wreath!
Also don’t forget to subscribe to my website for more Free Patterns to come.
If you have enjoyed this pattern you may also enjoy my:
Free Cuddly Bumble Bee Knitting Pattern
Free Cuddly Piggy Knitting Pattern
Free Sleepy Puppy Knitting Pattern
Free Cuddly Fox Knitting Pattern
xx Nicola.

Leave a Reply